There is a specific kind of frustration Mastering Trailer Wiring for the moment you’ve hitched up your trailer, loaded your gear, and checked your lights—only to find that the left blinker is dead or the brakes are surging. For many DIYers and weekend towers, trailer wiring feels like a dark art, a spaghetti mess of colored strands that rarely seems to work the same way twice.
In 2026, as trailers become more advanced with LED lighting arrays and integrated camera systems, the “Corner Wrench” perspective on wiring is more valuable than ever. Whether you are towing a small utility trailer or a massive 7-pin RV, understanding the “scoop” on your electrical connections is the difference between a safe trip and a roadside headache.
This guide breaks down everything from the standard color codes to the pro-level troubleshooting steps that will keep your connections solid.
The Mastering Trailer Wiring: 4-Way to 7-Way Explained
Before you start stripping wires, you need to know which “plug language” your vehicle and trailer are speaking. While there are dozens of international standards, North American towing relies on a few core configurations.
4-Way Flat Connectors
The “bread and butter” of the towing world. Found on small boat trailers and utility haulers, the 4-way flat provides the absolute essentials:
Running Lights
Left Turn & Brake
Right Turn & Brake
Ground It lacks a dedicated power source for brakes or auxiliary batteries, making it perfect for light-duty setups.
5-Way Flat Connectors
Commonly used for boat trailers equipped with surge brakes. The fifth wire (usually blue) connects to the vehicle’s reverse lights. This tells the trailer you are backing up, which disengages the hydraulic brakes so you can reverse without the trailer locking its wheels.
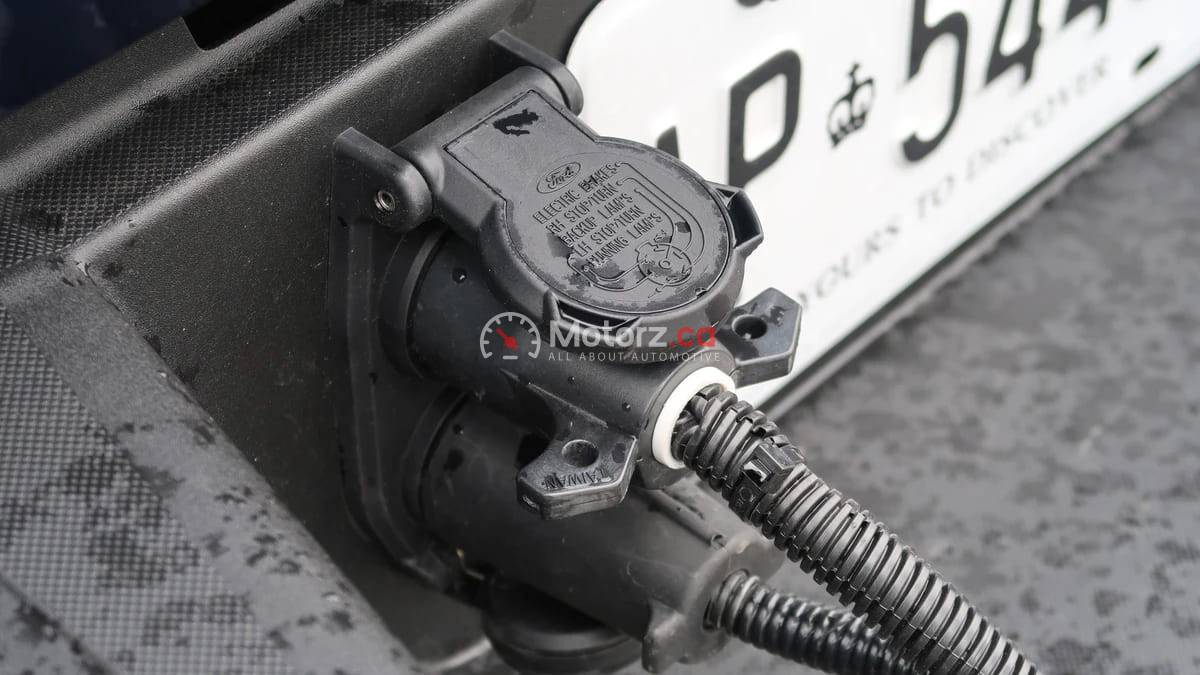
7-Way RV Blade Connectors
The gold standard for modern towing. This round, 7-pin plug is what you’ll find on almost every new pickup truck and SUV. In addition to basic lights, it handles:
Electric Brakes: Essential for heavy loads.
12V Auxiliary Power: Charges your trailer battery while you drive.
Reverse Lights: Provides visibility when backing up a large camper.
Decoding the Rainbow: Standard Wire Color Codes
The biggest mistake people make in trailer wiring is assuming the colors on the trailer side match the colors on the truck side. While there is a “standard,” variations exist. Here is the universal translation for most 4-wire and 7-wire systems.
The Core Four (Common to nearly all plugs)
White: Ground (The most important wire in the system).
Brown: Taillights, license plate lights, and side markers.
Yellow: Left turn signal and left brake light.
Green: Right turn signal and right brake light.
The 7-Way Additions
Blue: Electric brake controller output.
Black (or Red): 12-volt constant power (for battery charging).
Purple (or Yellow): Reverse/backup lights.
Expert Tip: In the 2026 SAE J2863 standard, some 7-way harnesses use Orange for 12V power and Grey for reverse. Always use a circuit tester to verify the pin’s function before finalizing a connection.
The “Ground” Rule: Why Your Lights Are Flickering
If you are experiencing “ghost” issues—like the right blinker flashing when you hit the brakes, or lights that dim and brighten randomly—you almost certainly have a grounding problem.
In trailer wiring, the White wire must be securely fastened to a clean, unpainted metal section of the trailer frame.
Avoid Rust: Salt and road grime cause corrosion at the ground screw.
Metal-to-Metal: Use a wire brush or sandpaper to clear away paint and rust before attaching your ground terminal.
Don’t Rely on the Hitch: Many people think the metal-on-metal contact of the hitch ball provides a ground. While it can sometimes work, it is “dirty” and inconsistent. Always use a dedicated ground wire.
Pro Troubleshooting: How to Find the Short
When a fuse blows the second you plug in your trailer, you have a short circuit. This usually means a power wire has frayed and is touching the metal frame.
Step-by-Step Diagnostic
Isolate the Truck: Use a 4-way or 7-way plug tester on your vehicle’s socket. If the tester lights up correctly, the problem is on the trailer side.
Inspect the “Pinch Points”: Look at where the wiring harness goes through the trailer frame or near the axle. Road debris often nicks the insulation here.
Check the Sockets: Remove the lenses from your taillights. Corroded sockets are a prime spot for “cross-talk” between wires.
The Multimeter Test: Set your multimeter to Continuity (the setting that beeps). Touch one lead to the trailer frame and the other to each pin on the trailer plug. If it beeps on any pin except the white ground pin, you’ve found your short.
Maintenance for 2026: Protecting Your Connection
Electrical systems hate two things: moisture and vibration. To ensure your wiring lasts as long as your trailer, follow these maintenance hacks.
Dielectric Grease: Apply a generous amount of dielectric (non-conductive) grease to your plug pins every season. This creates a waterproof seal that prevents the green “copper rot” from forming.
Heat Shrink Everything: Never use “twist-on” wire nuts or basic electrical tape for permanent repairs. Use heat-shrink butt connectors. When heated, they release a glue that seals the connection from road salt.
Wire Looming: Protect exposed wires with split-loom plastic tubing. Secure it with UV-resistant zip ties to prevent the wires from dragging on the pavement.
Ready for the Long Haul
Trailer wiring doesn’t have to be a mystery. By mastering the 7-way pinout and prioritizing a solid ground, you can tackle almost any towing task with confidence. Remember: the goal isn’t just to make the lights flash—it’s to ensure the electrical “loop” is closed and protected from the elements.