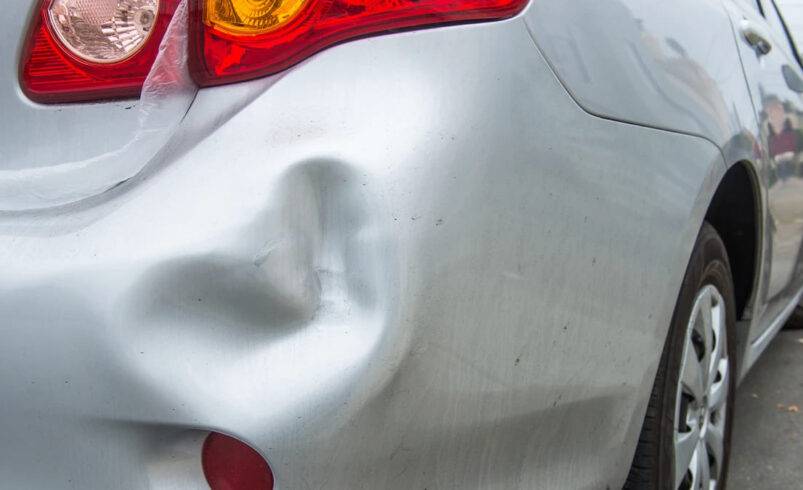
We’ve all been there. You walk back to your Car Dents in a crowded grocery store parking lot, and there it is—a fresh, depressing dent in your passenger door. Or perhaps a sudden hailstorm turned your hood into a piece of hammered metal. Your heart sinks because you already know what a professional body shop will say: “That’ll be 500 to 1,500, please.”
But here is a secret the body shops don’t want you to know: unless the paint is cracked or the metal is creased like a piece of paper, you can probably fix it yourself for less than the cost of a large pizza.
In this ultimate guide to DIY dent repair, we are going to explore the most effective, budget-friendly ways to restore your car’s bodywork. We’ll cover everything from the “hot and cold” method to specialized budget tools, helping you save money while keeping your ride looking sharp.
Assessing the Damage: Can You Fix It Yourself?
Before you grab a plunger or a hairdryer, you need to determine if your dent is a candidate for a DIY fix. Not all dents are created equal.
The Car Dents of DIY Dent Repair
If the paint is scratched, Car Dents, or flaking, popping the dent back out might actually make the damage worse. DIY methods work best on shallow, round dents where the metal has “popped” in but hasn’t been stretched or sharply creased.
Locations to Avoid
Edges and Seams: If the dent is right on the edge of a door or a body line, the metal is reinforced and much stiffer. These usually require professional hydraulic tools.
Plastic Bumpers: While you can fix these, the process is different from fixing metal panels.
Double-Walled Panels: Some areas of your car have two layers of metal. If you can’t reach the back of the dent, your options are more limited.
The Boiling Water Method (Best for Plastic Bumpers)
If your “dent” is actually a cave-in on your plastic front or rear bumper, this is the easiest and cheapest fix in existence.
Why It Works
Modern bumpers are made of plastic polymers that have a “memory.” When heated, the plastic becomes pliable and wants to return to its original molded shape.
The Process:
Boil a Large Pot of Water: You’ll need enough to soak the entire dented area.
Pour Slowly: Pour the boiling water over the edges and the center of the dent.
Reach and Push: Reach behind the bumper (you may need to unscrew a few clips from the splash guard) and gently push the dent outward.
Cool It Down: Once the bumper pops back into place, pour a gallon of cold water over it to “set” the plastic so it doesn’t warp as it cools.
The Hairdryer and Compressed Air Method
This is a classic “internet hack” that actually works on thin metal panels, like fenders and doors. It relies on the rapid expansion and contraction of molecules.
How it Works:
By heating the metal and then instantly freezing it, the sudden change in temperature causes the metal to expand and then contract violently, often popping the dent back into place.
The Process:
Heat the Dent: Use a hairdryer on its highest setting. Keep it about 6 inches away from the paint and move it in circles for about 2 minutes. The metal should be very hot to the touch.
Apply Compressed Air: Take a can of compressed air (the kind used for cleaning keyboards), turn it upside down, and spray the center of the hot dent.
Watch the Ice: The upside-down can will spray liquid nitrogen-cooled air, forming a layer of ice on the dent.
The Pop: Within 30 to 60 seconds, you should hear a “pop” as the metal snaps back. Wipe away the ice with a soft cloth.
The Kitchen Plunger Method
Yes, the same tool you use to fix a clogged sink can fix your car. However, you need a cup plunger (the one with a flat bottom), not a flange plunger (the one with the extra rubber fold on the bottom).
Best For:
Large, shallow dents on flat surfaces like the hood or roof.
The Process:
Clean the Area: Dirt will break the suction. Wash the dent and the plunger.
Lubricate: Put a little bit of water or petroleum jelly on the rim of the plunger to create a better seal.
Push and Pull: Push the plunger in slowly until it sticks, then give it a firm, fast tug. Do not use extreme force, or you might pull the metal too far and create a “high spot.”
The Glue Puller Kit (The Pro-Style Budget Move)
If the hairdryer or plunger didn’t work, it’s time to spend a little bit of money—usually around 20 to 40—on a Paintless Dent Repair (PDR) Glue Puller Kit.
What’s in the Kit?
These kits come with plastic tabs of various sizes, a specialized hot glue gun, and a “bridge” or “lifter” tool.
The Process:
Select a Tab: Choose a plastic tab that is slightly smaller than the center of the dent.
Apply Hot Glue: Put a generous amount of the specialized PDR glue on the tab and press it into the center of the dent.
Wait: Let the glue dry for about 5 to 8 minutes. It should be firm but slightly rubbery.
The Pull: Attach the bridge tool to the tab and slowly turn the knob. This applies even, outward pressure.
Clean Up: Use rubbing alcohol (90% isopropyl is best) to spray the glue. It will cause the glue to release from the paint instantly without leaving a mark.
Using a Vacuum Cleaner and a Bucket
This is a creative DIY hack for larger dents that require more suction than a plunger can provide.
The Setup:
Take a small plastic bucket and cut a small hole in the bottom that is just big enough for your vacuum hose to fit through.
Tape the bucket over the dented area using painter’s tape (which won’t damage your clear coat). Ensure the rim of the bucket creates a seal around the dent.
Plug your shop-vac hose into the hole in the bucket and turn it on.
The vacuum creates a low-pressure zone inside the bucket, which can often pull larger dents back to their original shape.
Important Safety Tips for DIY Dent Repair
While these methods are “on the cheap,” they aren’t without risk. Keep these tips in mind to avoid a “DIY Fail”:
Watch the Heat: If you use a heat gun instead of a hairdryer, be extremely careful. Heat guns can get hot enough to bubble your clear coat or melt plastic trim.
Don’t Over-Pull: It is better to pull a dent 80% of the way out than to pull it 110% out. A “high spot” (where the metal sticks out) is much harder to fix than a dent.
Work in the Shade: Never try to fix dents on a car that has been sitting in the direct sun. The metal is already expanded, which makes it less “springy” and harder to pop back.
When to Admit Defeat
DIY dent repair is a fantastic way to save hundreds of dollars, but it has its limits. If you have tried the methods above and the dent hasn’t moved, or if the metal looks “stretched,” it’s time to call in a professional Paintless Dent Repair (PDR) specialist.
PDR pros use long, specialized metal rods to “massage” the dent out from the inside. While they cost more than a plunger, they are still significantly cheaper than a traditional body shop that would require sanding, filling, and repainting.