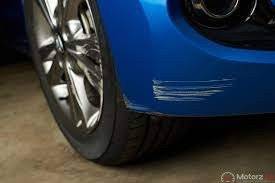
Paint Scratches How to fix minor paint scratches The allure of a freshly painted car is undeniable, but the harsh reality is that even the most pristine vehicles are susceptible to the unsightly blemishes known as paint scratches. Whether it’s a stray shopping cart in the parking lot or a minor collision with a low-hanging branch, these scratches can mar the beauty of your prized possession. The good news is that you don’t need to rush to the auto body shop for every little scratch. In this comprehensive guide, we’ll explore the world of minor paint scratches and unveil the secrets to restoring your car’s finish to its former glory.
Understanding Paint Scratches:
Before delving into the solutions, it’s essential to understand the different types of paint scratches. Lead-based paint scratches generally fall into two categories: clear coat scratches and deeper scratches that penetrate the base coat. Clear coat scratches are superficial and affect only the outer layer of paint, while deeper scratches expose the base coat, making them more challenging to fix. These products can often blend and minimize the appearance of superficial scratches. For deeper scratches, you might need to go a step further. Touch-up paint that matches your car’s color can be carefully applied to fill in the exposed base coat.
Tools and Materials:
To embark on your journey of scratch restoration, you’ll need a few essential tools and materials.
Microfiber cloths
Car washing soap
Water hose
Rubbing alcohol
Fine-grit sandpaper (2000-3000 grit)
Scratch remover compound
Polishing compound
Car wax
Step-by-Step Guide to Fixing Minor Paint Scratches:
Clean the Surface:
Begin by thoroughly cleaning the scratched area with car washing soap and water. This removes any dirt or debris that could further damage the paint during the repair process. Carefully assess the depth of the scratch. If it’s a clear coat scratch, you’re in luck as these are easier to fix. Deeper scratches may require a bit more effort. Use a steady hand and apply thin layers, allowing each layer to dry before adding the next. For a seamless finish, consider wet sanding the repaired area with a fine-grit sandpaper once the paint has fully cured. Finish off by polishing and waxing the treated area to restore the overall shine and protection of your car’s paint.
Prepare the Surface:
For clear coat scratches, dampen a microfiber cloth with rubbing alcohol and gently wipe the scratched area. This eliminates any remaining contaminants and ensures better adhesion of the repair products. For deeper scratches, use fine-grit sandpaper (2000-3000 grit) to feather the edges of the scratch. Be gentle and keep the sanding area limited to the scratch itself. Applying a clear coat touch-up pen or repair kit is the next step. Follow the product instructions carefully and take your time to achieve a smooth and even application. After the clear coat has dried, you may want to use a polishing compound to blend the repaired area with the surrounding paint. This not only enhances the appearance but also helps achieve a seamless finish.
Apply Scratch Remover Compound:
Using a clean microfiber cloth, apply a small amount of scratch remover compound to the scratched area. Follow the product instructions and rub the compound in a circular motion until the scratch is no longer visible. Once the scratch is minimized or eliminated, use a polishing compound to restore the shine to the treated area. Apply the compound in a circular motion and buff it with a clean microfiber cloth. To safeguard your efforts and provide an extra layer of protection, apply car wax to the repaired area. This not only enhances the gloss but also shields the paint from future scratches.
Conclusion:
In the world of automotive aesthetics, minor Paint Scratches are an unfortunate reality. However, armed with the right knowledge and tools, you can take matters into your own hands and restore your vehicle’s paint to its former glory. Remember, patience and attention to detail are key when fixing paint scratches. So, roll up your sleeves, follow this comprehensive guide, and let the beauty of your car shine through, unmarred by the imperfections of everyday life.