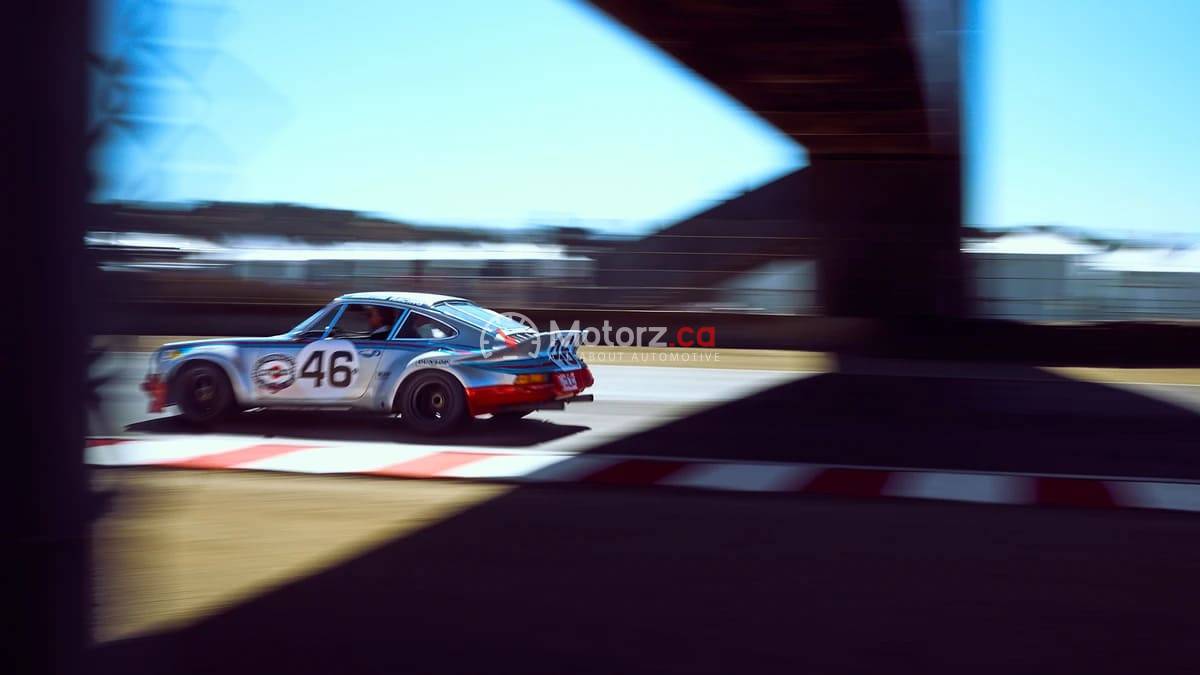
There is a specific kind of magic that Perfect Panning Shots when you perfectly execute a panning shot. You’re standing on the side of a winding mountain road or at the edge of a racetrack. A machine worth tens of thousands of credits screams past you. In a fraction of a second, you track its movement with your lens, press the shutter, and pray to the gods of optics.
When you look at the back of your camera, you see it: a tack-sharp car frozen in time, surrounded by a cinematic explosion of motion blur. The wheels are spinning into beautiful circles, and the background has been stretched into long, painterly streaks.
Panning is one of the most difficult yet rewarding techniques in automotive photography. It is the art of capturing speed. Unlike a static shot, which shows what a car looks like, a panning shot shows what a car does. In this guide, I will take you behind the lens to explain exactly how I get the shot, from the gear I use to the physical movement required to nail the focus every single time.
What Exactly is Perfect Panning Shots?
Before we dive into the technical settings, we need to define the goal. Panning is a photographic technique where you use a relatively slow shutter speed and move your camera in sync with a moving subject.
The result is a subject that appears sharp while the stationary background becomes blurred in the direction of the camera’s movement. In car photography, this creates a sense of “rolling motion.” Without this technique, a car moving at 100 kilometres per hour can look like it is simply parked on the road if your shutter speed is too high. Panning injects adrenaline into the frame.
The Essential Gear for Panning Shots
You do not need the most expensive camera in the world to take great panning shots, but certain tools make the process much more consistent.
The Right Lens Choice
While you can pan with a wide-angle lens, most professionals prefer a telephoto zoom, such as a 70-200mm. A longer focal length allows you to stand further back for safety while compressing the background, which enhances the “streak” effect of the blur.
Neutral Density (ND) Filters
On a bright, sunny day, you might find that even at your lowest ISO and smallest aperture, your shutter speed is still too fast to get a good blur. This is where a Neutral Density filter comes in. Think of it as sunglasses for your lens. An ND8 or ND16 filter will block enough light to allow you to drop your shutter speed down to the sweet spot without overexposing the image.
Circular Polarizers (CPL)
Reflections are the enemy of automotive photography. A CPL filter is essential for cutting through the glare on the windshield and the side panels of the car. It allows the viewer to see the driver and the interior, adding a human element to the mechanical speed.
Camera Settings for Panning Success
The most frequent question I get is: “What shutter speed should I use?” The answer is: it depends on how fast the car is moving.
The Shutter Speed “Sweet Spot”
The goal is to go as slow as possible while still maintaining a sharp subject.
For slow-moving street cars (30 to 50 km/h): Start at 1/30 or 1/40 of a second.
For fast road cars (60 to 100 km/h): Try 1/60 or 1/80 of a second.
For race cars on a track (150+ km/h): You can often get away with 1/125 or 1/160 because the subject is moving so quickly across your field of vision.
Focus Mode and Drive Mode
You must set your camera to Continuous Autofocus (AF-C on Sony/Nikon or AI Servo on Canon). This allows the camera to “track” the car as it moves closer to or further away from you.
Additionally, use your High-Speed Burst Mode. Panning is a game of averages. Even the best photographers in the world will only get one or two “perfectly” sharp shots out of a ten-shot burst. Give yourself the best chance by firing off multiple frames as the car passes through your frame.
The Technique: How to Move Your Body
Panning is as much a physical skill as it is a technical one. You are essentially turning your upper body into a human tripod.
The Stance
Plant your feet firmly, shoulder-width apart, facing the spot where the car will be at its closest point to you. Your feet should not move during the shot. Instead, rotate your body at the hips.
The “Lead-In” and “Follow-Through”
This is the most common mistake beginners make. They wait for the car to get in front of them, click the shutter, and stop. To get a sharp shot, you must:
Pick up the car in your viewfinder while it is still far away.
Half-press the shutter to lock focus.
Start your rotation, matching the speed of the car perfectly.
Depress the shutter as the car passes the “apex” of your arc.
Follow through. Keep rotating even after you have finished taking the pictures. This ensures a smooth, linear motion throughout the exposure.
Composition: Where to Place the Car
In a panning shot, composition is vital because the background becomes a series of horizontal lines.
Leave “Lead Room”: Always leave more space in front of the car than behind it. This gives the car “room to drive into” and creates a more natural, dynamic feeling for the viewer.
Watch Your Backgrounds: Panning blur looks best when there is “texture” in the background. A solid blue sky won’t show any blur. Look for trees, fences, guardrails, or spectators. These elements will turn into beautiful streaks that emphasize the speed.
The Focal Plane: Try to stay parallel to the car’s path. If the car is driving toward you at an angle, different parts of the car will be at different distances from your lens, making it nearly impossible to get the whole side of the vehicle sharp at a slow shutter speed.
Pro Tips for Sharper Results
If you are struggling to get sharp results, try these advanced insights that the pros use to “cheat” the system.
Use Back-Button Focus
By separating the focus function from the shutter button, you can track the car with your thumb and fire the shutter with your index finger. This prevents the camera from “hunting” for focus at the exact moment you want to take the picture.
Focus on a Specific Detail
When you are looking through the viewfinder, do not try to “look at the car.” Instead, pick a specific high-contrast detail, like the manufacturer’s badge on the grille, the driver’s helmet, or the door handle. If that one tiny point is sharp, the rest of the shot will feel successful.
Image Stabilization Settings
Many modern lenses have a “Mode 2” or “Panning Mode” on their stabilization switch. Traditional stabilization tries to cancel out all movement. Mode 2 only cancels out vertical shake while allowing for smooth horizontal movement. Ensure you have this turned on if your gear supports it.
Troubleshooting Common Panning Issues
Problem: The front of the car is sharp, but the back is blurry.
Reason: This usually happens when the car is moving past you at a very close distance or an angle. As the car moves, the distance from your lens to the front bumper changes at a different rate than the distance to the rear bumper.
Fix: Stand further back and use a longer focal length (zoom in). This flattens the perspective and puts more of the car on the same focal plane.
Problem: The car is sharp, but the wheels look static.
Reason: Your shutter speed is too fast.
Fix: Drop your shutter speed. To get “full wheel rotation” (where you can’t see the spokes clearly), you usually need to be at 1/60 or slower.
Problem: My images are way too bright.
Reason: You are using a slow shutter speed in bright light, and your aperture is already at its limit (e.g., f/22).
Fix: This is exactly why you need an ND filter. If you don’t have one, try to shoot during the “Golden Hour” (sunrise or sunset) when the light is less intense.
Post-Processing Your Panning Shots
Even a great shot can be improved with a few minutes in Lightroom or Photoshop.
Straighten the Horizon: In the heat of the moment, it is easy to tilt the camera. A perfectly level horizon makes a panning shot feel much more professional.
Enhance the Streaks: Use the “Linear Gradient” tool to slightly increase the contrast and clarity in the blurred background. This makes the motion lines pop.
Subject Masking: Use AI masking to select the car and increase the “Texture” and “Sharpness” slightly. This helps the car stand out even more from the blurred surroundings.
Radial Blur on Wheels: If your shutter speed was a bit too fast and the wheels look a little stiff, you can add a subtle “Spin Blur” in Photoshop to finish the effect.
Practice Makes Perfect
Panning is a perishable skill. Even the pros have “off days” where their timing is just a millisecond out of sync. If you are just starting out, do not be discouraged if you go home after a day of shooting with 500 blurry photos and only 2 sharp ones. Those two shots will be worth the effort.
The best way to learn is to head to a safe spot near a road with consistent traffic. Spend an hour practicing on everyday commuters. Once you can consistently hit a sharp shot at 1/60 of a second on a sedan, you’ll be ready to capture the high-octane action of a supercar or a professional race.