It starts as a tiny, innocent-looking brown bubble beneath your Automotive Corrosion. You might glance at it and think you can handle it next spring. But beneath the surface, a silent chemical war is being waged against your car. Rust never sleeps, it never takes a break, and it never stops eating away at metal until there is nothing left but flakes and holes.
When it comes to automotive maintenance, the golden rule is absolute: you must get all the rust, or it will get you. Leaving even a microscopic speck of corrosion behind during a repair is the equivalent of leaving a single ember burning in a dry forest. It is only a matter of time before the destruction breaks out all over again.
Whether you are looking to restore a classic car, protect your daily commuter, or save your vehicle from a harsh winter climate, understanding how to completely eradicate rust is a critical skill. This comprehensive guide will cover the science of corrosion, how to spot hidden damage, and the exact step-by-step methods required to remove rust permanently.
The Automotive Corrosion: Why Partial Rust Removal Fails
To defeat your enemy, you must understand how it operates. Rust is the common name for iron oxide, a compound formed when iron, oxygen, and moisture collide. This chemical reaction is known as oxidation.
When steel is exposed to air and water, the chemical process begins. What makes rust uniquely dangerous compared to other forms of corrosion is that it expands. As iron transforms into iron oxide, it swells to several times its original thickness. This expansion flakes away the protective paint and exposes fresh, uncorrupted metal underneath to the elements.
If you sand away the top layer of rust but leave a tiny trace of iron oxide trapped in the microscopic pits of the steel, you have not fixed the problem. You have simply buried it. The remaining oxygen and moisture sealed inside will continue to eat away at the panel from the inside out, eventually causing your new paint job to bubble, crack, and fail.
The Three Stages of Automotive Rust
Not all rust damage is identical. To choose the correct repair method, you must identify which stage of corrosion you are dealing with.
Surface Rust
This is the earliest and easiest stage to fix. Surface rust occurs when the vehicle’s clear coat and paint layer are nicked by a stone chip or scratched, allowing moisture to touch the bare steel underneath. It looks like a cosmetic blemish or a light powdering of discoloration. At this stage, the metal retains its full structural integrity.
Scale Rust
If surface rust is ignored, the chemical reaction penetrates deeper into the metal. Scale rust happens when the corrosion begins to pit the surface of the steel, creating a rough, uneven texture. The flakes become larger and brittle. At this stage, the structural strength of the metal panel starts to degrade, and simple sanding is no longer enough to fix the issue.
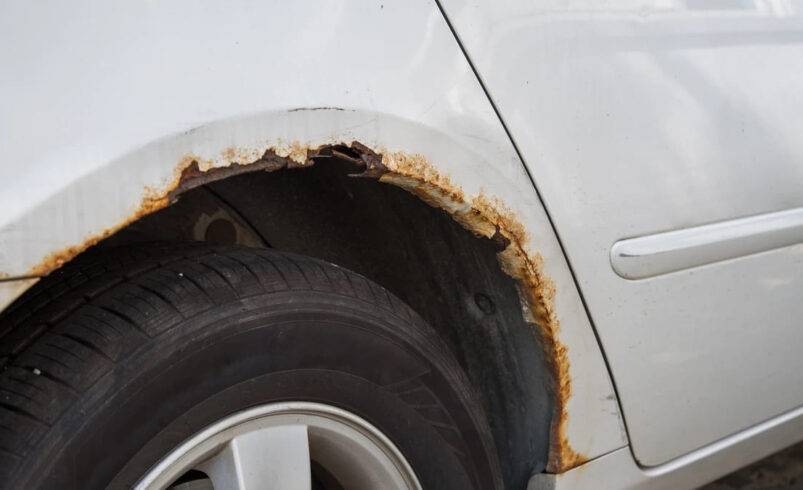
Penetrating Rust
This is the final, fatal stage of corrosion. Penetrating rust means the iron oxide has eaten completely through the steel panel, leaving holes, structural weakness, and crumbly edges. This is highly dangerous when it occurs on vital structural components like the vehicle frame, floor pans, or suspension mounting points. At this stage, the metal cannot be cleaned or treated; it must be completely cut out and replaced with fresh steel.
Tools and Materials Needed for Total Rust Eradication
Before starting any rust removal project, gathering the correct tools ensures a thorough and safe repair.
Mechanical Removal Tools
Angle Grinder: Excellent for rapidly removing heavy scale rust on thicker metal parts.
Wire Wheel Attachments: Perfect for cleaning out pitted metal and tight crevices where sandpaper cannot easily reach.
Dual-Action Sanding Machine: Ideal for smoothing out surface rust on flat body panels without warping the sheet metal.
Assorted Sandpaper: A mix of coarse grits like forty or eighty grit for removing rust, and fine grits like three hundred and twenty or six hundred grit for paint preparation.
Chemical Treatments and Safety Gear
Rust Converter or Phosphoric Acid: A chemical solution that transforms remaining microscopic iron oxide into an inert, paintable compound.
Wax and Grease Remover: For cleaning the panel before painting to ensure optimal adhesion.
Respirator Mask: Crucial for protecting your lungs from toxic rust dust and chemical fumes.
Safety Glasses and Heavy Gloves: Essential protection against flying metal sparks and sharp wire wheel strands.
Step-by-Step Guide to Permanent Rust Removal
To guarantee that you get all the rust, follow this disciplined automotive restoration procedure. Skipping steps or rushing will only result in the rust returning within a matter of months.
Step 1: Assess and Isolate the Damage
Wash the entire vehicle to find the exact boundaries of the damage. Use a masking tape line to isolate the work area, leaving a generous margin around the visible rust spot. Rust often spreads farther beneath the paint than what is visible to the naked eye. Tap the area with a small hammer or screwdriver; if the metal feels soft or makes a dull thud, you are dealing with deep penetrating rust rather than surface discoloration.
Step 2: Strip the Paint and Grind the Metal
Using a coarse eighty-grit sanding disc or a wire wheel, begin removing the paint and primer around the rust spot. You must strip the area down to bare, shiny steel. Expand your grinding area at least two inches beyond the visible rust zone to catch any hidden microscopic corrosion spreading under the surrounding paint.
Step 3: Dig Deep into the Pits
Once the bulk of the rust is gone, look closely at the bare steel. If you see dark brown or black specks embedded in the tiny valleys of the metal, that is pitted rust. Do not stop grinding yet. Use a wire brush wheel or a specialized abrasive blasting tool to clean every single pit until the entire surface is uniform, bright silver.
Step 4: Apply a Chemical Rust Killer
Even after meticulous grinding, microscopic traces of iron oxide can remain hidden from view. To guarantee complete elimination, apply a high-quality phosphoric acid-based rust treatment. This liquid chemical reacts with any lingering iron oxide and converts it into iron phosphate, a stable black hard coating that seals out moisture and serves as an excellent base for primer. Allow the chemical to fully cure according to the manufacturer instructions.
Step 5: Prime and Seal the Metal
Bare steel will begin to rust again almost immediately when exposed to ambient humidity. As soon as your chemical treatment is fully dry, wipe the area down with a wax and grease remover. Immediately apply a high-quality epoxy primer. Epoxy primer forms an airtight, moisture-proof barrier over the metal, preventing oxygen from restarting the oxidation process. Following the primer, you can apply body filler to smooth out any low spots, followed by sanding, paint base coat, and clear coat.
How to Deal with Penetrating Rust: Cutting and Welding
When the corrosion has created actual holes in the vehicle body, sanding and chemical sprays are completely useless. The only way to save the vehicle is to surgically remove the infected metal.
Marking the Cut Line
Draw a cut line at least one inch away from the rotted edges into perfectly healthy, uncompromised steel. If you weld a patch patch onto weakened, thin steel, the heat from the welding process will simply burn away the metal, and any remaining rust nearby will quickly destroy your new repair panel.
Fabrication and Welding a Patch Panel
Use a metal cutting wheel or air shears to remove the rotted section entirely. Once the hole is cut out, treat the interior of the frame or panel cavity with a weld-through zinc primer to prevent future internal corrosion.
Carefully shape a new piece of sheet metal to match the exact dimensions of the hole. Weld the patch panel into place using small, spaced spot welds to prevent warping the metal with excess heat. Once fully welded, grind the weld seams smooth, apply a thin layer of body filler, sand flat, and apply your protective primers and paint.
Proactive Rust Prevention: Keeping the Metal Safe
The best way to handle rust is to never let it start in the first place. Once your vehicle is completely free of corrosion, implementing a strict preventative maintenance routine will preserve your hard work for years to come.
Wash the Undercarriage Frequently: During the winter months, road crews spread salt and liquid chemical de-icers to clear snow. These chemicals act as powerful catalysts that accelerate the rust process dramatically. Wash the underside of your vehicle weekly during cold weather to rinse away these corrosive deposits.
Apply Oil-Based Anti-Corrosion Sprays: Avoid old-fashioned rubberized undercoatings, which can crack over time and trap moisture directly against the metal frame. Instead, use thin, oil-based or wax-based rust prevention sprays. These products actively creep into tight seams, body cavities, and pinch welds, displacing moisture and forming a self-healing protective barrier.
Fix Stone Chips Immediately: Keep a small vial of factory-matched touch-up paint and clear coat in your glove box. When a flying stone chips your hood or rocker panels, clean the spot immediately and seal it with touch-up paint before moisture can initiate surface rust.
Complete Eradication is the Only Option
Taking shortcuts with automotive rust is a guaranteed waste of time and resources. If you attempt to save time by skipping the tedious work of digging out deep pits or failing to expand your sanding zone, the corrosion will return with a vengeance.
Approach rust removal with a patient, zero-tolerance mindset. Treat every tiny speck of brown discoloration as a threat to the lifespan of your vehicle. By removing every single bit of corrosion, applying the right chemical sealants, and maintaining a proactive wash routine, you can keep your vehicle safe, structural, and beautiful for hundreds of thousands of miles. Get all the rust, and your car will stay yours for the long haul.